

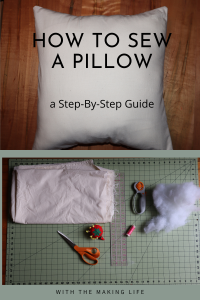
How to Sew a Pillow
Are you looking for a very easy sewing project? I have you covered with this guide about how to sew a pillow.
If I were to think of a good first project for crochet, I would recommend a crochet dishcloth. If I were to think of a first sewing project it would definitely be a pillow. A pillow requires some very basic sewing skills and you only need to be able to sew straight lines on your sewing machine. (Even if your lines aren’t perfectly straight you can still sew a pillow).
Let’s get to it, starting with the supplies you’ll need to make a pillow.
Disclosure: As an Amazon Associate we earn from qualifying purchases.
Table of Contents for Easy Navigation
What You Need to Sew a Pillow
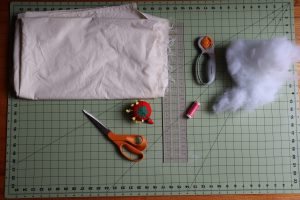
- Fabric of choice – I used muslin fabric I found at JoAnn Fabrics. It was a simple cream color and easy to work with.
- Scissors
- Rotary cutter – I like to use a rotary cutter when I cut straight lights of fabric
- Grid ruler
- Cloth ruler (not pictured)
- Pins
- Pincushion (there are some really cute ones on Etsy)
- Thread – I like to use Gutermann thread because it’s higher quality and seems to do better in my sewing machine, but you can use whatever works best for you and your machine.
- Cutting mat – This is optional. If you’re using scissors instead of a rotary cutter, you won’t need a cutting mat.
- Pillow stuffing
- Iron
- Ironing board
- Needles
- Sewing machine
Step #1: Wash Your Fabric
The first step for almost any sewing project is to first wash and dry your fabric. This will help you avoid shrinking fabric that can ruin your projects should you need to wash them in the future.
Step #2: Iron Your Fabric

The following step is to iron your fabric. Before you work with your fabric, it’s a good idea to iron it smooth. It’s easier to sew and your finished project will be nicer. My fabric doesn’t look the best in this guide because my 12-year-old-iron was on the fritz and not ironing well, but yours will look amazing. (I did order a new iron since then :))
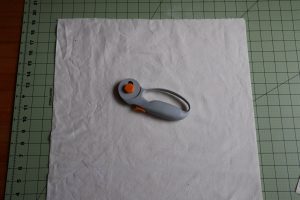
Step #3: Measure and Cut Your Fabric

The next step is to measure and cut your fabric. I wanted my pillow to be 16×16 when it was done so I cut it out 17×17 for a half-inch seam allowance. You can make your seam allowance a little smaller or bigger if you want, but that’s what I measured for. For me, the measurement of the pillow doesn’t have to be super exact. Unless I was selling these pillows or making multiples and wanted them to all be the exact same size, I’m not too worried about my pillow being slightly bigger or smaller.
I used my cutting mat and fabric ruler to measure out my cuts, and then I put a little cut mark at the measured spot. Then I lined up my grid ruler in place on my cutting mat, and cut along the edge with my rotary cutter. You can use the grid on the cutting mat to help keep your cuts straight.
You can choose to cut the pillow into two separate pieces that are 17X17 or you can cut the side edge to be 17 inches and the other side to be double that -1 inch (33 inches). This allows you to make the pillow by only having to sew three sides of the pillow instead of four. You will decrease by one inch because you will not be sewing that side and therefore you won’t have to account for the half-inch seam allowance.
Here’s the end result:
Step #4 Pin the Fabric Together
The next step is to pin your fabric together. This keeps your fabric from shifting while sewing and helps keep your lines straight. I would recommend putting your pins about 1.5-2 inches apart.
Step #5: Sew the Edges of Your Pillow
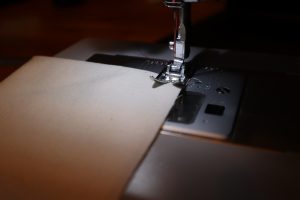
The next step is to sew along the edge of your pillow. In the picture above I’m sewing along the edge of my presser foot which is less than 1/2 inch. To make the seam allowance half an inch, follow the guidelines on the plate of the sewing machine. You can also use a sewing gauge to measure out your seam allowance.
My fabric is the same on the front and the back, if your fabric has a right side and a wrong side, you would want to begin with right sides together.
If you’re sewing two pieces of fabric together, choose one side and start sewing about 2/3 ways down the side. When you’re done sewing, you’ll leave an opening that’s about 3-4 inches wide so you can add your stuffing. That’s why you start 2/3 down one side of the pillow as opposed to in the corner or the middle.
If you’re sewing three sides of the pillow (one side is just folded over to create that closed side), you’ll start in one corner. Then you will stitch along the one side of the pillow, turn the piece, and sew about 1/3 of the way long the edge. Here you’ll do a back stitch, skip about 1/3 (or a little less) of the side, and continue on with the rest of the pillow.
As I’m sewing around the pillow, I like to do an additional backstitch at each corner. This reinforces the stitch and allows me to start where I left off in case I have an issue when I turn the corner (such as my thread bunching).
To turn at the corner stitch to the end, lower your needle into the fabric, lift the presser foot, and turn the entire fabric piece around so you can begin stitching the new side. Once you have your fabric in place again (remembering your seam allowance) drop the presser foot back down and sew along the next edge.
![]()
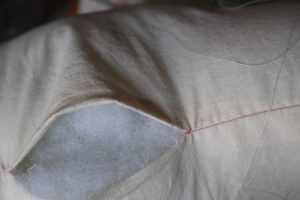
When you’re finished, you’ll have a small gap left that you will later be using to fill with stuffing. You can see in the picture above the opening I left for this pillow.

I used pink thread for this pillow because I was matching the pillow to a pink bedroom and I liked this little accent. I also liked using it because you can easily see it for the sake of this tutorial. You can also use a coordinating thread that will not show up at all when you’re done.
Step #6 Flip The Pillow Right Side Out
Now that you’ve sewn most of your pillow, it’s time to flip it right side out. Before doing that, you can carefully cut the corners of the pillow (but make sure you don’t accidentally cut into your stitching).
Reach inside the pillow and pull it out like you would if you were fixing an inside out t-shirt. You can reach in with your hand and push out the four corners so the pillow looks crisp and clean and ready for stuffing.
Your pillow will look like this before it’s stuffed.

Step #7 Fill Your Pillow With Stuffing

Ah, now it’s time for the stuffing.
To fill your pillow, start by stuffing the four corners. First fill the corners furthest from the opening, then the corners nearest the opening. You can tease the stuffing apart to make it less lumpy. Once you have the four corners stuffed, you can move on to the center. It’s up to you how much stuffing you want to use, but it’s best to at least make a nice even pillow. If you put in extra stuffing it will make the pillow a bit firmer to start, but the pillow stuffing will flatten some over time.
I personally would avoid overstuffing the pillow, but it’s really up to you and what you want your pillow to look like and feel like.
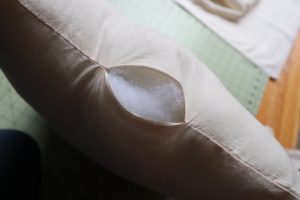
When you’re finished stuffing the pillow, it’ll look like this. You’ll have a small little opening left that will still need to be stitched up.
Step #8 Sew Up the Gap
The last step of making your pillow is to stitch up the gap. Arguably this is the most difficult/technical part of the project, especially if you don’t have much experience sewing by hand. But don’t worry, it’s still on the easy side and it won’t take too much effort to learn how to close it up.
To close your pillow you’ll be using a stitch called a ladder stitch or an invisible stitch.

This stitch is really cool. It alternates from either side of the opening of the seam, and when you’re finished you really can’t see the stitches. This is what it looks like all closed up:

I found this video tutorial from OnlineFabricStore very helpful for teaching how to do the invisible stitch!
Step #9 Enjoy Your Pillow!
Annnd that’s it! You’ve created your pillow!

This tutorial works better for making a pillow form or a pillow insert. I would suggest making a pillowcase that you can put over it because it’s much easier to wash a pillowcase than it is to wash an entire pillow.
Now that you have your pillow insert made, it’s time to make a cover for it. Head on over to our How to Make an Envelope Pillowcase guide to learn how!


2 Comments
Pingback:
Pingback: